


Digging for shells at the beach has always been a favorite of mine. I remember as a little girl going on family vacations and digging knee-deep to find the prettiest of shells. Oh, the excitement it brings to find a beautiful shell intact. I would collect shells from every family vacation and carefully place them in ziplock bags, and label them, until my return home so I would know what trip and beach they came from.
I still find myself sifting the sand to find beautiful shells to carry home when I visit the beautiful beaches nearby. Next time you take a trip be sure to save your treasures for these fun beach day DIY activities.
For these DIY projects, you’ll first want to wash your seashells and clear them of any remaining sand. I soak them in room-temperature water overnight. Room-temperature water keeps the fragile shells from cracking.
The next morning, pull out your shells and dry them off. You can also rub small amounts of mineral oil onto the shells to polish them before making your crafts! It gives a nice little shine to them.
With spring’s arrival and summer soon following, these fun DIYs are perfect for all your warm-weather gatherings.
Beach Treasure DIY Activities
Make A Seashell Planter
What You’ll Need:
- Cleaned shells of your choice from any trip
- A hot glue gun with glue sticks
- Super glue
- Planter of your choice
- Potting soil
- Plant
- Mineral oil (optional)
You’ll start at the base and hot glue shells around the entire base of the planter forming a bottom row of shells. From there, you simply build upon your planter. The beautiful thing is it does not have to be perfect. You can use even those imperfect shells, shark teeth, and broken sand dollars that you’ve found.
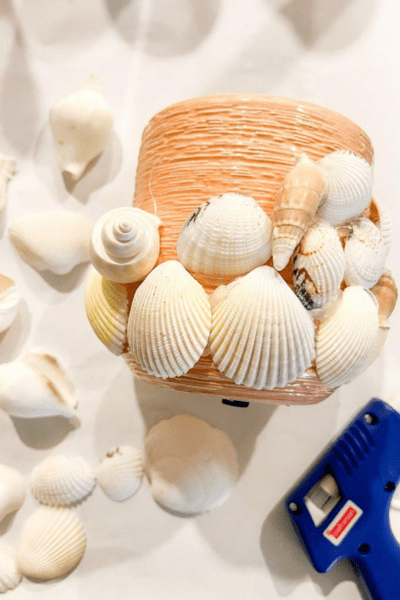
Use super glue for the hard-to-stick shells. If you’re using this planter outdoors be sure to point the fan of the cockle shell downward to ensure rain falls off of it versus gathering inside of it which can lead to unwanted critters.
Once your planter is complete, air dry for 24-48 hours before adding your potting soil and plant!

This next DIY is so simple and adds a touch of summer fun to your backyard.
Making Seashell Patio String Lights
What You’ll Need:
- Cleaned shells of your choice from any trip
- A hot glue gun with glue sticks
- Outdoor LED string lights
You’ll first pair your cleaned fan shells in groups of two, both similar in size, to glue together over each LED light. Take a hot glue gun and glue the inside of the outer edge of the shells and close them along the string part of the LED lights while the glue is still wet. Be sure to keep the actual light in the middle of the closed shells. And don’t glue the light! Repeat this process over every light bulb. Once dried, hang it up on your patio for a beautiful set of lights and party decor for your backyard gathering.
This last DIY is for the kids! Let your little one pick out shells and treasures from the beach to make this cute craft of their own.
Making Sea Animals
What You’ll Need:
- Air dry craft clay
- Craft paint
- Paint brushes
- Cleaned shells from your trip
- Hot glue gun with glue sticks
First, you’ll craft your sea animal body. The possibilities are endless here and it’s always fun to see your little one’s creativity!

For our sea turtle, you’ll make two arms, two legs, a tail, and a head. For our octopus, you’ll make five legs and a head out of the air dry clay.
You’ll help your child mold the different body parts and set them out to dry completely. Generally, the clay is dry overnight but at most 48 hours.
Once the clay is dry you’ll then paint the different animal parts. You’ll then let them dry completely again before gluing them to the inside of the shell using the hot glue gun.
And now they have a cute sea animal craft!

They can place their sea animal in their room to remember the beach trips they’ve taken or share them with friends as little gifts
And if you’re like me, I love cherishing handmade crafts that my little one has made, so on the inside of the shell I write the date and age when they made them with a permanent marker to keep for many years to come.
I always enjoy finding treasures on each trip to continue to create fun projects from our beautiful beaches. Next time you take a beach trip be sure to save some treasures of your own to make these fun seashell DIYs!
")


")
